Project: Boiler Automation
Building a smart central heating and hot water controller with an Arduino, a Pi Zero W and Home Assistant.
The Brief
My study/workspace is in the basement, which can get cold. The central heating button is two floors up at the opposite end of the house. I wanted a cheap, non-invasive device to press the button via a friendly web UI!
The Plan
- Actually use one of the many Arduinos I have lying around (a 5V Pro Mini in this case as I was going to add an external regulator).
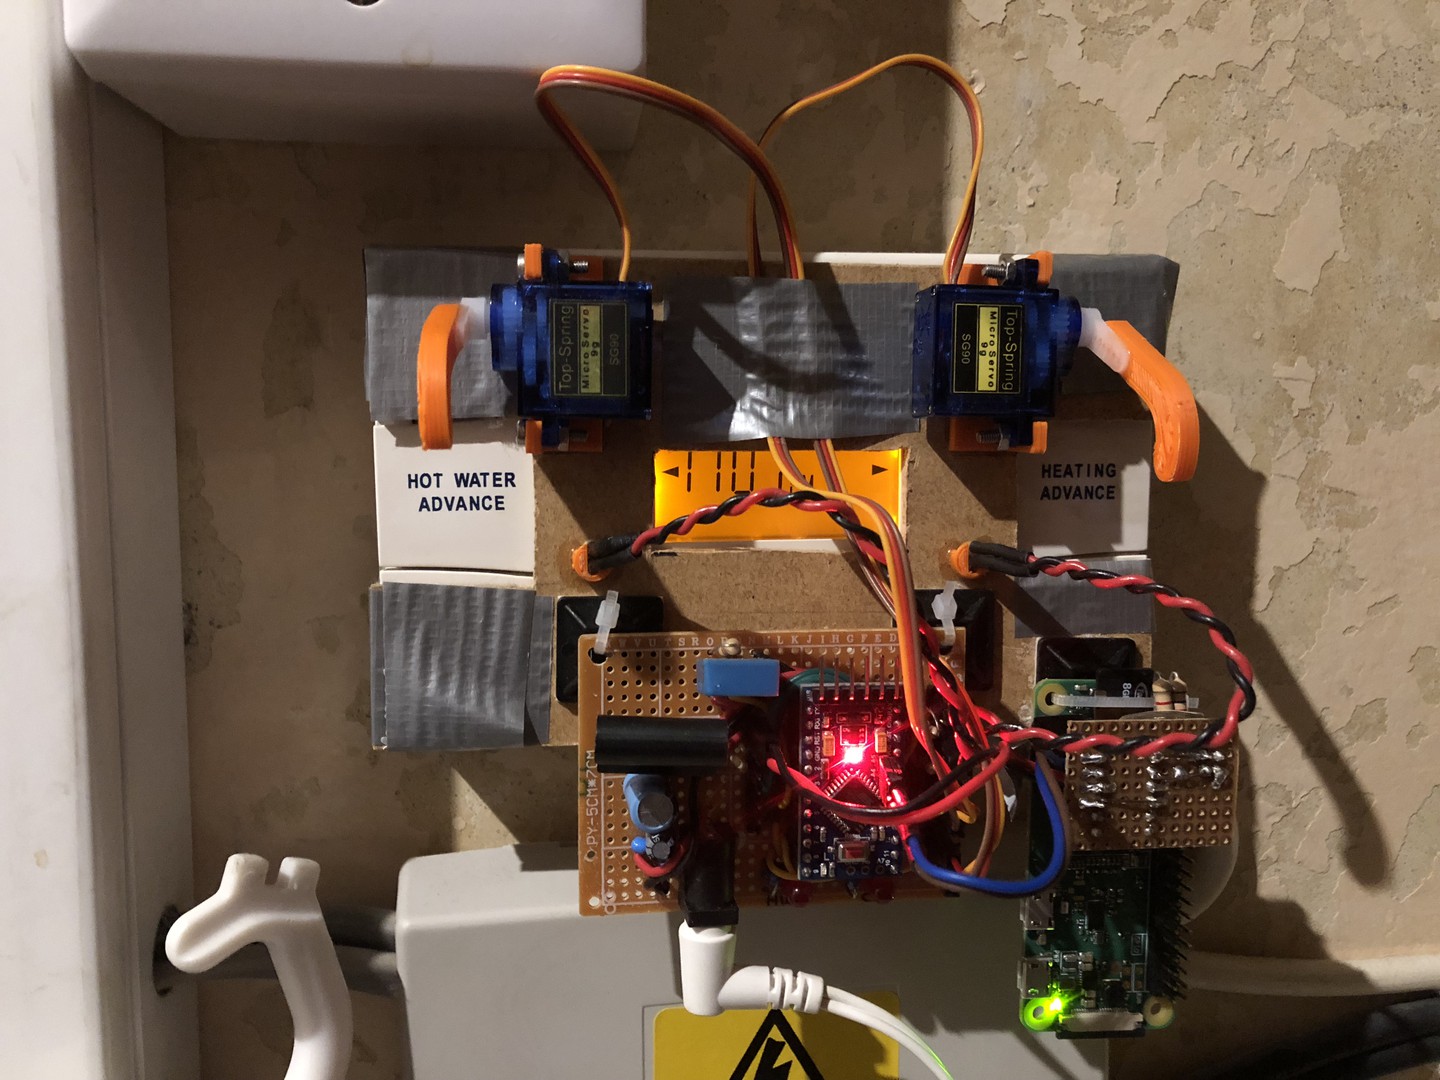
- Press the central heating and hot water buttons with using servos, with the 'fingers' resting in a retracted position so the buttons can still be reached.
- Read the central heating and hot water 'on' lights so it can report the status if changed manually.
- Read the temperature and humidity of the airing cupboard the boiler controller is in (as I also have plenty of DHT11s lying around).
- Communicate with the Arduino using nRF24L01+ 2.4GHz transceiver boards using RF24Mesh, as I was interested in adding other devices to a house mesh network.
- Set up Home Assistant as the friendly web UI and write a device plugin for it, running on my Kickstarter-backed UP2 home server (yes, I backed a hardware Kickstarter and it actually made it to production).
What went right
- To try new tools, I used PlatformIO on VSCode on macOS, which is an excellent setup for development on multiple connected Arduinos.
- Controlling the servos using the Arduino PWMs was a doodle, as was reading the lights with LDRs.
- Making servo/LDR mounts and button pressing 'fingers' is also a doodle if you have a 3D printer.
- Added a beefy 5V regulator to power the Arduino, servos and transceiver.
- Managed to get the nRF24L01+ boards registering with RF24Mesh and communicating Arduino to Arduino.

What went wrong
- Initially couldn't get the nRF24L01+ boards to work at all, even with the recommended passive components on the supply, and thought I'd managed to pick up a batch of dodgy copies that had the ACK bit flipped. Bought a power breakout adapter for my breakout adapter that came with its own 3.3V regulator and the passive components on a PCB which seemed to solve the issue.
- With the nRF24L01+ boards communicating Arduino to Arduino, the boards could not reach the distance required, even with the transmission power at maximum and the bitrate reduced to 250kpbs. Replacing them with nRF24L01+PA+LNA boards (that were thankfully pin-compatible with the power breakout boards) solved the range problem.
- RF24Mesh supports running the master node on Raspberry Pi and Linux with a number of IO drivers, so I thought getting it running on the UP2 would be simple as it is Pi GPIO compatible. Not so much. Submitted a pull request to get it building correctly with MRAA, but even then it wouldn't remain connected for more than 30 minutes without sporadic GPIO timeouts. Gave up.
- As I'd got the Arduino to Arduino communication working, thought the I could attach the nRF24L01+PA+LNA boards to an Arduino set to behave as an I2C node to the UP2. Built a 3.3V to 5V level-switching board with pull-ups for the I2C bus between the Pi and Arduino, not strictly needed as I2C pins are high impedance, but didn't want to risk blowing the Pi up if I accidentally set the pins wrong. Tested the I2C communications with a PCF8574P (again, lying around) then implemented the Arduino as an I2C node. Worked. Attached the nRF24L01+PA+LNA. Still unreliable. Gave up.
- Was so close to completion but couldn't determine whether the 2.4GHz communication problems were the beta-ness of the mesh network library, electrical noise from the boiler or servos, being overpowered by other local WiFi hubs, dodgy Pi GPIO compatibility on the UP2, my ineptitude or a combination of them all.

What went right (finally)
- Replaced the nRF24L01+PA+LNA with a Pi Zero W, as I have perfectly good WiFi in my house, communicating with the Arduino via I2C (phew, the code and Pi-to-Arduino board weren't wasted).
- Found out you can power the Pi via the GPIO 5V pins, admittedly bypassing the fuses, so could run it off the existing 5V regulator.
- Wrote a simple web API for the Arduino with Flask, which I ran as a single-threaded single process so I didn't have to think about shared resource management and locking access to the I2C bus BECAUSE I JUST WANTED IT FINISHED.
- Installing Home Assistant on the UP2 and writing a switch-derived custom plugin was easy. It has good documentation and being on GitHub you can read the code of the existing plugins.
- Configured Home Assistant security and port-forwarded 443 (SSL with Let's Encrypt of course) to the UP2 so I can control it on the go!
- Even with the unused transceivers, the whole device cost about £20.

Conclusion
It was a fun and practical project that has made my life better (lazier) and even my other half thinks is incredibly useful. So glad to finally find a use for a parts I'd bought thinking 'they would be useful'. Spent way too long with the 2.4GHz transceivers, just because I liked the thought of a house mesh network. Will try them again for future outdoor projects and use a programmable WiFi chip (like an ESP8266) for indoors.
What's left
It's been working well for a while now but there are a few things that can be done:-
- tidy and publish the Arduino, Flask and Home Assistant plugin code.
- make the cables a bit less chaotic looking.
- replace the gaffer tape with a better way to mount (and dismount) the board.
- replace the cable ties fixing the controller circuit and Pi to the board with something less dangly.
- move the DHT11 so it isn't just taking the temperature of the 5V regulator.
- disable the boiler timer and control the schedule with a Home Assistant plugin.
- add wireless thermometers around the house to Home Assistant so I can tune the radiator thermostats and possibly get Home Assistant to control the heating to maintain a set temperature.
Posted Mon 19 Feb '18 in Build


